
Keep up with us on:
![]()
![]()
![]()
![]()
![]()
@bergenbrick
Paver Installation Guide
|
“Do-It-Yourself” Paver Installation Guide |
||||||||||||||||
|
The following information should be used as a guide as you prepare to install interlocking pavers yourself. |
||||||||||||||||
|
Some Notes before you begin... Before excavating the site, do not hesitate to contact any public utility companies if there is any doubt as to the presence of underground wiring or pipes.
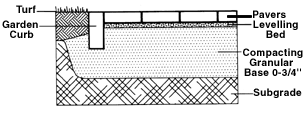
If you are replacing a layer of asphalt that has deteriorated over time, with no major depressions, it is not necessary to reconstruct a deep granular base before installing concrete pavers. Simply level and compact the surface base and add the leveling bed as shown in the diagram on left. |
||||||||||||||||
|
||||||||||||||||
|
The following information should be used as a guide as you prepare to install interlocking pavers yourself. |
||||||||||||||||||||
|
Carefully mark off the perimeter of the project site by outlining the area to be excavated. The excavation must be carried out in such a way as to create a 2% slope to allow for proper drainage. This same slope will be repeated later on by the surface of the granular base, the leveling bed and the finished surface of the pavers. Level and compact the bottom of the excavated area.
|
||||||||||||||||||||
|
Spread and compact 0 - 3/4” crushed stone in successive layers of 4” to form the base. Compact the materials using an appropriate vibrating roller: When this operation is completed to the desired height, the ground contour should be the same as that of the paved surface. To provide effective support for the cement curbing and paving stones, the granular base must extend at least 8” beyond the outer edge of what will be the finished paved surface, throughout the perimeter. The installation of curbing will require slight excavation and alignment, and, finally |
||||||||||||||||||||
|
 To prevent contamination of granular base, the use of geotextile is recommended, particularly where clay-like soils are involved.
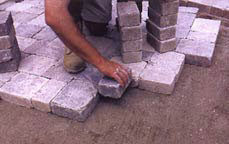
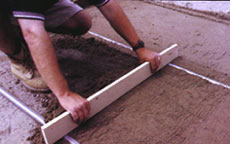
 Once the model of the paver and the laying pattern have been selected, place the first pavers at a
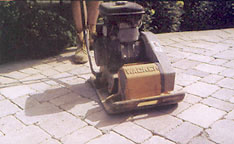
685 Wyckoff Avenue, Wyckoff, NJ 07481
Exterior /Masonry Department: 201-891-3500
Interior Tile Department: 201-891-0088
Fax: 201-891-0220
![]()
![]()
![]()
![]()
![]()
Store Hours:
M-F: 7:30 AM - 4:30PM
Saturday: 8AM-1PM
Click to add text...
Copyright©2019 All Rights Reserved.